Shred Jesse
21 January 2025
Section
Tutorials / DIY
Mechanical Skill
Driveway
Ah the never ending conversations about oil. From misinformation, to factory recommendations, to outright bull... there's a lot of information out there. We're here to help you weed through it all!
Useful Information
| Factory Oil Weight | 5w30 (Mobil1 Called for by factory) |
| Oil Capacity | 6.5 quarts with filter change |
| Track / Aggressive Oil Capacity | 1 Qt overfilled |
You'd think there wouldn't be much more to say beyond this, but please do recognize these are starting points. Your needs may differ, and while the GM engineers surely knew what they were up to, a lot of compromises had to be made to ensure these cars could both be driven in Alaskan winters and idle for 4 hours stuck in Arizona traffic.
How to Perform a Basic Oil Change
Items you will need:
- An oil catch pan that can hold at least 7 quarts
- A 15mm socket or 15mm wrench
- Oil Filter
- 6.5qts (7.5 for track usage) of oil in the correct weight for your application.
Items that are nice to have:
- Oil filter pliers / wrench
- Oil Fill Funnel
- Nitrile or equivalent gloves
- 1 gallon ziplock bag
- A big piece of cardboard to catch small drips
- Paper Towels or shop towels because drips happen
- Kitty litter incase there's a spill off the cardboard, or worse case scenario it soaks through.
- A bunch of old jugs to pour the old oil in to take to get recycled.
Oil Change Steps
- Before you even start, if you drove the car recently for any significant distance, let the car cool down for a while.
- With a cooled engine, raise the car in the air to allow access underneath the car. A lift is awesome, but most of us don't have one. You can simply jack the car up as well or use quikjaks, or any other myriad of options out there. For more information on that, check out our article on jacking up a Corvette.
- Crack open the oil fill cap on the Corvette, which is located on the passenger side head of the engine and is labeled fairly obviously. You want air to be able to enter the engine, but don't need to fully open the cap yet.
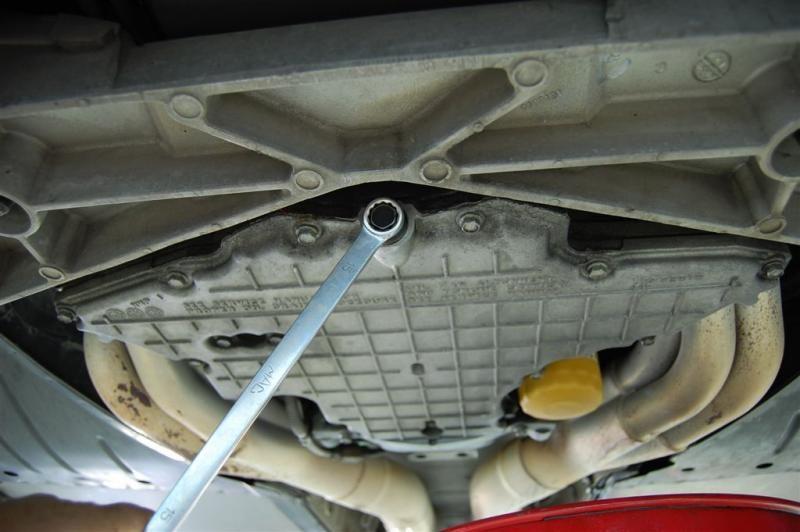
- With the car in the air and supported, Setup your drain pain directly below the drain bolt on the engine so it can collect oil. The drain bolt is located at the rear of the "batwing oil pan" and should be fairly obvious. Also, please ensure the pain is setup to collect oil, which generally that involves removing a lid and/or opening a vent hole so as air can come out as oil goes into the pan. Also be aware that oil will come out at an arc at first as the oil drains out, and then generally slow to a trickle straight down from the oil drain location. Position your oil catch pan accordingly
- Crack open the oil pan drain bolt with the ratchet or wrench. Do not undo it all the way however. Once cracked, it should be able to be undone by hand. Undo the bolt by hand, ideally position your arm away from the drain so as oil doesn't run down your arm. If you have a oil catch pan that can catch the bolt, just let it drop right on down.
- Oil will now begin to empty from the engine. Go ahead and just wait a while until the car has slowed to a trickle. When that is complete, reinstall the drain bolt and tighten to just barely snug. Do NOT overtorque it you will create a nightmare for yourself if you damage those threads or strip the bolt.
- Now, move over to the oil filter. Position your oil catch can pan below the oil filter. Ideally oil filters should only be on hand tight, but I'll be damned if one I've put on by hand ever came off again by hand. I personally like to use the linked above pliers to help break the oil filter loose. Once the oil filter is cracked loose, I recommend you take the 1 gallon ziplock bag, place it over the oil filter, and finish loosening the oil filter by hand with the bag over it. Oil will start to leak out and run down the filter, which would normally go down your arm and/or wind up on the ground, but if you've used a plastic bag it will catch all of it. Dump the oil filter into the pan, and await for oil to stop running out of where the oil filter was.
- Now we get to reinstalling the oil filter. Be sure to check that the rubber gasket came off with the removed oil filter. It sounds silly, but that day you accidentally still have an oil filter gasket stuck on the motor causing your next filter to not seal, you'll know why we recommend this. Take a small dab of the old motor oil and wipe down the new oil filter gasket.
- A note about pre-filling oil filters. I was always for it, and even saw a good video demonstrating how important it is, demonstrating that pre-filling the oil will ensure you car acheives proper oil pressure early. However, it turns out I was wrong as was demonstrated by another individuals testing and sharing technical documents from the manufacturers. Essentially... it doesn't matter, and it runs the risk of accidentally putting contaminates into the system as the oil you put in the filter is POST the oil filter. So in short... don't fill the oil filter, it's fine.
- With the oil filter reinstalled, pour the first quart of your 6.5 quarts of oil into the engine and confirm nothing is leaking from below the car. If something is leaking, attend to it, otherwise simply pour the reminder of the required oil into the engine Start the car, and let it run until you see oil pressure reach cold operating level (40~psi cold).
- Check oil level. Add oil if necessary to acheive the correct level, and don't worry if the reading is slightly high. If you are tracking your car or aggressively driving it (track/drag/race/AX) then add in another quart of oil. This additional quart of oil will help fight oil starvation during heavy G events beyond what is experienced by 99.9% of street driven Corvettes.
- Crack a beer or soda or whatever does the trick for you and celebrate that you just finished changing the oil on your C5 Corvette
Tag(s)